Bubble Squeeze
What it does:
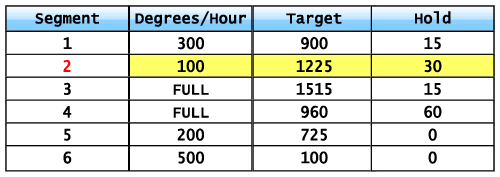
Reduces number and size of bubbles both between the layers of glass and between the glass and the kiln shelf. This stage also prepares glass for more even fusing. Here is an example of the firing schedule step required for a Bubble Squeeze phase:
Things to consider:
Glass is heavy. By spending extra time in the slumping range, the weight of the glass will help the glass layers settle together, squeezing out air that might otherwise be trapped between them or between the glass and the shelf. With less trapped air, bubbles become smaller and occur less frequently.
Here are some reasons to consider lengthening the Bubble Squeeze:
- The glass has an uneven surface that creates places for air to get captured.
- Your project includes wide pieces of glass where escaping air has a long distance to travel to escape.
- You’ve been having problems with large bubbles bursting through the surface of you work.
A typical bubble squeeze might be only 30 minutes long. An extreme bubble squeeze can last two hours or more. Keep in mind that fused glass is rarely completely free of bubbles.
A lesser known bubble squeeze benefit:
In addition to minimizing trapped air, there’s another benefit to holding your glass at 1225° F: Glass will melt more evenly when it fuses together. Why? While glass is a great insulator when solid, as it softens it changes into an increasingly good conductor. Glass molecules that “loosen up” during the bubble squeeze allow the heat required for fusing to move more easily – and thus more evenly – in the steps that follow.
Back to Glass Firing Schedules Start