Kiln-Pressed Glass
Are you tired of typical, two and three layer fully fused glass art?
Have you have ever wished you could create the watercolor-like effects that are typical in blown glass – but seem impossible to achieve in fused glass?
If so, this unusual and original glass fusing tutorial is for you.
The technique is one we call “kiln-pressed glass” and it is something we’ve developed at Helios over the past year. We doubt we’re the first to do what we describe, but we’ve never seen it discussed elsewhere and we are pretty sure that nobody else has documented and shared the technique before now.
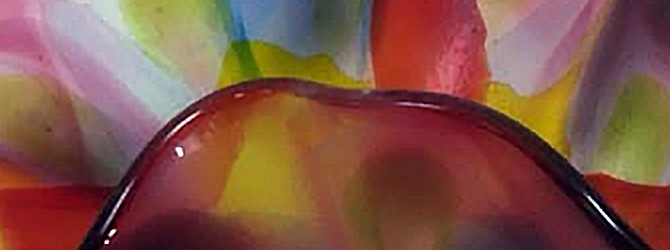
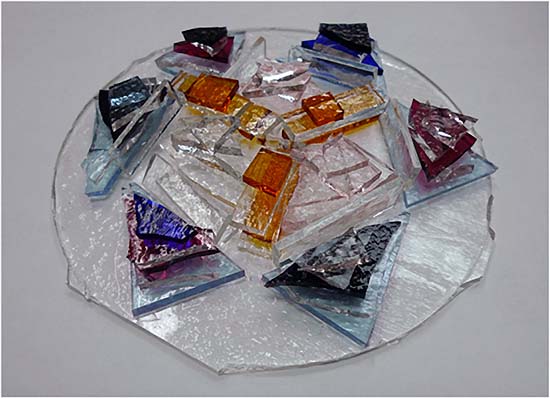
Kiln-pressed glass is so full of potential that we want to share it so that we can see what others are able to create with it. Here’s just one example of what’s possible. It is the piece that we create with the tutorial:

To help you fully appreciate kiln-pressed glass, we’ll start with a brief review of how glass melts and why it is difficult to create thin fused glass objects.
Surface Tension
All liquids have surface tension – the attraction between molecules that, on the surface of a liquid, causes the liquid to behave as if it had a thin skin. Surface tension, for example, is why water drops on a slick surface will “bead” up.
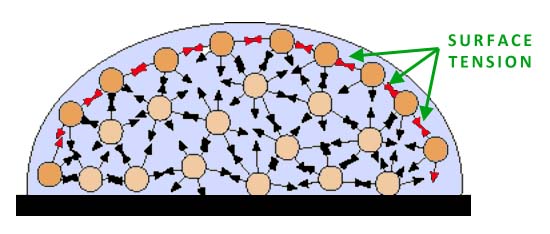
Surface tension strength is different for different liquids. Mercury, for example, has very strong surface tension. Acetone, in contrast, is very weak. The strength of the surface tension of glass at 1500° F is somewhere between the two. The strength of the surface tension determines the natural height of the liquid when allowed to spread.

For glass at 1500° F, that height is about ¼ inch (6 mm) – which is the same height as two standard layers of glass. Understanding how this impacts the results when fusing is one of the most important lessons a fused glass artists can learn:
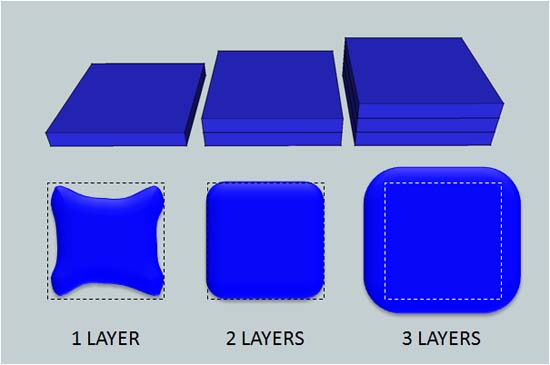
- If your project has less glass than in two complete layers (for example, a single layer with only a few design elements), the edges of the base glass will begin to pull up as the glass tries to achieve the ¼ inch thickness.
- If your project has close to two complete layers (for example a single layer of glass with a complete second layer of design elements), the glass will flatten when fully fused – but will maintain its overall shape.
- If you have more than two layers of glass, the glass will spread when fully fused (unless you contain it with dams)
Here’s a simple illustration showing the above three examples:
But what if you want a fully fused design – but you want it to be a single layer thick?
One solution is to fuse the thick project and then grind it down with coldworking equipment, such as a reciprocating lapidary grinder like this one:
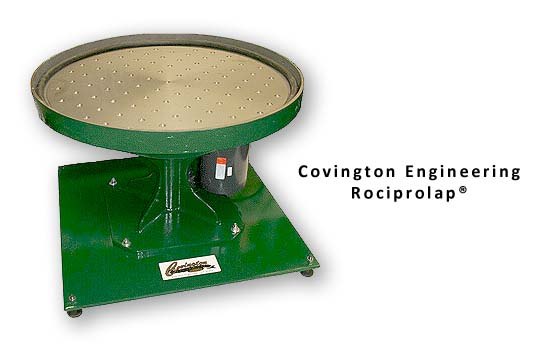
That approach requires expensive equipment, a lot of time, and you end up wasting a lot of material by grinding it away.
With kiln-pressed glass, you probably already have everything you need, the work is all done in the kiln, and there is no wasted glass.
Curious how it works? Keep reading!
Overcoming Surface Tension
The basic idea behind kiln-pressed glass is that we can defeat the surface tension and create thin glass by squeezing it from above using weights. The basic setup looks like this:

As shown, the glass is placed between two kiln shelves and weights are placed on top. Small fiber strips placed in the corners act as spacers to prevent the glass from being pressed too thinly.
The concept is surprisingly simple but the results can be spectacular.
Setting Up the Glass
The setup for our project is includes a lot of clear glass and some strategically placed transparent colors. One of the best parts about kiln-pressed glass is that transparent colors that often seem too dark to be useful in typical fused glass projects dilute to wonderful hues in kiln pressed glass.
When stacking your pieces of glass, make sure that there are three or more equal high points. This ensures that the top kiln shelf is level when placed on the glass.
Although not required, the base piece of glass makes it easy to build your piece and move to the kiln. It will also help you to achieve the smoothest possible surface after firing. In this example, the base is about 6 inches across.
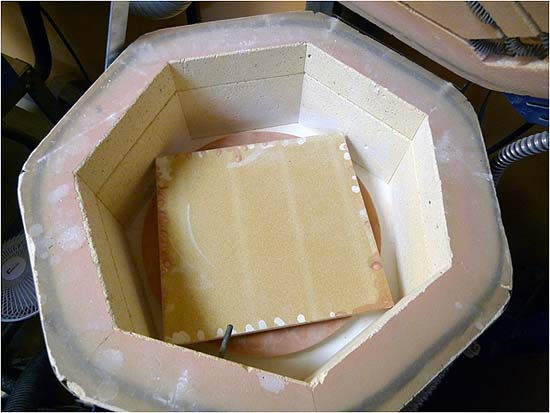
Place your setup on a freshly primed (kiln washed) shelf as shown:

Note the fiber paper strips that have been placed near the edge of the shelf. The height of the fiber paper (once fired) will determine the thickness of your final piece.
We are now ready for the top shelf and weights.
Setting Up the Weights
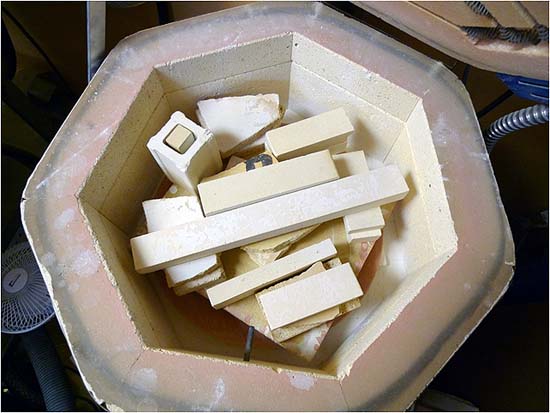
Coat your second shelf with shelf primer and place it (primer down) on top of your glass as shown:
Make sure that the shelf is either below the thermocouple (the small metal rod that sticks out of the wall of your kiln) or, if it is above the thermocouple, that there is no chance of it hitting the thermocouple as the glass melts and the shelf moves down.
If you have stacked the glass as described, with there being at least three, equally tall stacks, the shelf should be level.
Now place your weights on top of the shelf. Old pieces of kiln shelf, high density fire bricks and kiln furniture are all suitable.How much weight? The more you can fit, the more you can trust the glass to thin to the height of the fiber spacers.
Do not use stones! Stones can contain water that expands when heated, causing the stone to explode.
Here’s our top shelf loaded with weights:
We are ready to go!
Close the kiln and fire as explained below.
Firing the Glass
Here is our firing schedule for our kiln-pressed glass:
| Segment | Ramp | Target | Hold |
| 1 | 300° F / hr | 1225° F | 3 hours |
| 2 | FULL | 1500° F | 1.5 hours |
| 3 | FULL | 900° F | 2 hours |
| 4 | 100° F / hr | 700° F | none |
The long hold at 1225° F allows the glass to compress, eliminating much of the trapped air and helping the shelf to stay level as it drops.
The long (90 minute) fuse ensures that the glass is fully pressed so that the shelf rests on the fiber spacers.
Our annealing (from 900° F to 700° F) is fairly aggressive – that’s because our glass is exceptionally thin so there is little reason to be worried about heat differentials.
After 700° F, we can let the kiln cool naturally. Thanks to all the extra mass provided by the weights, cooling will be very slow. You can vent the kiln at 500° F and open it fully at 300° F without worrying about thermal shocking the glass (again – because it is so thin). At 200° F, remove all the weights and shelf to allow the piece to finish cooling. Be careful when taking out the weights – they will often be hotter than the ambient temperature of the kiln.
With the weights and top shelf removed, you should see something like this:

Congratulations! You’ve completed your first kiln-pressed glass!
We aren’t stopping there, though. Read on to see how we can continue to improve our project.
Making it Spectacular
We don’t have to stop with a single pressing. With additional glass and pressings the results can get pretty spectacular.
Here’s our setup for the second pressing. Note that we have sandblasted the surface of our first results to ensure we’ve removed any residual kiln wash.
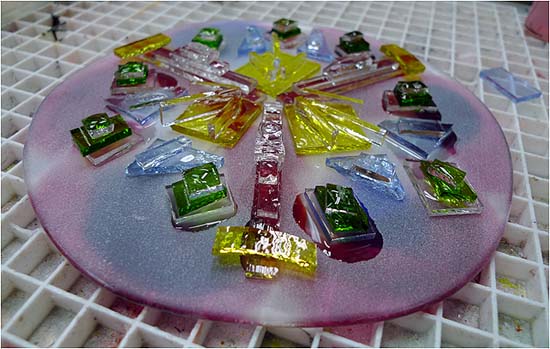
Here’s a close-up:
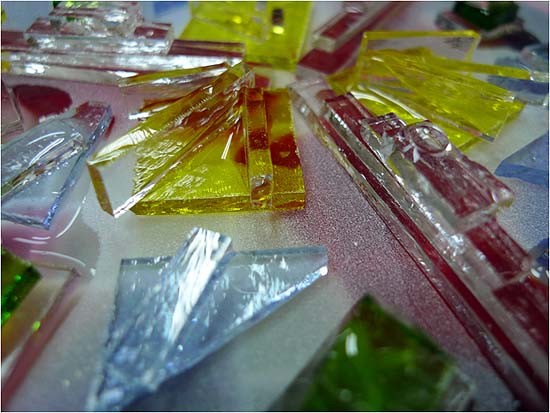
In addition to more color, we’ve also made careful choices about adding some clear pieces to the mix. The clear glass will cause the color glass to spread more, thinning it out, and diluting the color. Using clear glass this way can provide wonderfully subtle color variation and create vibrant watercolor effects.
We repeat the same setup and firing schedule as with our first pressing, slump the piece over a handkerchief mold for the results shown below!
Finished Project and Tips
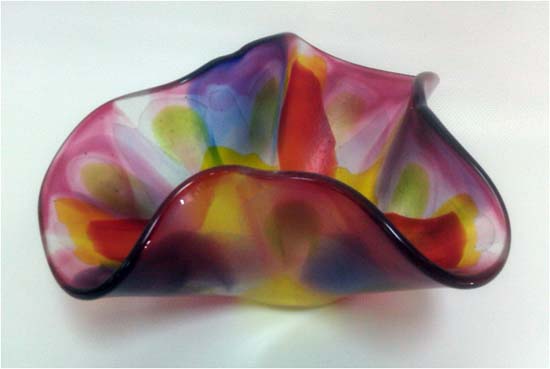
Kiln-pressed glass has endless possibilities and produces work unlike most of what is being created by fused glass artists today.
To help you on your way, here are some tips:
Glass reactions (the color changes that occur when certain glasses are fused together) tend to be intense in kiln-pressed glass. You can avoid this by placing clear glass between the reactive colors. You can see this in the finished piece above – reds, yellows, greens and blues all overlap without creating browns that would typically occur when mixing these colors.
As mentioned in the article above, many of the transparent colors available today are very saturated and appear almost black without a light behind them. When thinned during in a kiln-pressed glass project, these same colors often produce gorgeous hues.
Pay attention to how glass spreads when pressed – usually from the center out to the edge. With practice, you can be increasingly deliberate with your design.
Use a scale to determine how much glass you are going to press. If you use too much glass, it will squeeze out from under the top shelf. One square inch of a single layer of fusible glass weighs about 0.2 ounces (5.5 grams). You can use this value to determine how much glass is needed for a given size – or, you can simply use our Pot Drop Calculator to do the work for you.
That’s it! Go press some glass!
Back to Fused Glass Project Tutorials Start